今回はダンジョンにいるキャラクターたちの現在座標と向き/イベントメッセージ表示についてお伝えします。この記事までを完成させることで、上記画像のようなダンジョンが実装可能です。(上記画像をクリックすると動きがわかります)
この記事は以下の別記事の内容までを実施したあとのものです。
現在地と向きの画面表示
移動・旋回が成功した直後に自分のデータ (座標と向き) を自動更新して、画面出力するロジックを追加します。最初にコンソールに出力する方法を確認してから画面表示に移ります。詳しくは以下をご確認ください。
- 現在座標と向きをコンソール出力
- 現在座標と向きの画面表示
現在座標と向きをコンソール出力
extends Camera3D

# 方向を定義する列挙型(Wizの基本4方位)
enum Direction { NORTH, EAST, SOUTH, WEST }

const MOVE_STEP: float = 2.0
const ROTATE_STEP: float = 90.0
const WALL_ITEM_ID: int = 1

# 現在のプレイヤーの論理ステート
var current_grid_pos: Vector2i = Vector2i.ZERO # マップ上の(X, Z)座標
var current_dir: Direction = Direction.NORTH    # 現在の向き(初期値:北)

@onready var grid_map: GridMap = $"../GridMap"

func _ready() -> void:
	# ゲーム開始時の初期座標と向きを計算して同期する
	update_player_status()

func _unhandled_input(event: InputEvent) -> void:
	if not event.is_pressed() or event.is_echo():
		return

	if event.is_action_pressed("move_forward"):
		try_move_direction(Vector3(0, 0, -1))
	elif event.is_action_pressed("move_backward"):
		try_move_direction(Vector3(0, 0, 1))
	elif event.is_action_pressed("move_left"):
		try_move_direction(Vector3(-1, 0, 0))
	elif event.is_action_pressed("move_right"):
		try_move_direction(Vector3(1, 0, 0))
	elif event.is_action_pressed("turn_left"):
		rotate_horizontal(ROTATE_STEP)
	elif event.is_action_pressed("turn_right"):
		rotate_horizontal(-ROTATE_STEP)

func try_move_direction(local_direction: Vector3) -> void:
	var direction_vector: Vector3 = global_transform.basis * local_direction
	direction_vector.y = 0
	direction_vector = direction_vector.normalized()

	var target_global_pos: Vector3 = global_position + (direction_vector * MOVE_STEP)
	var map_coord: Vector3i = grid_map.local_to_map(grid_map.to_local(target_global_pos))
	var cell_item_id: int = grid_map.get_cell_item(map_coord)

	if cell_item_id == WALL_ITEM_ID:
		return

	# 移動成功時のみ座標を更新
	global_position = target_global_pos
	update_player_status()

func rotate_horizontal(deg: float) -> void:
	rotate_y(deg_to_rad(deg))
	# 旋回成功時のみ向きを更新
	update_player_status()

# 💡 3D空間の物理的な状態から、RPG用の論理データ(座標・向き)を抽出して更新する関数
func update_player_status() -> void:
	if not is_inside_tree():
		return

	# 1. 3D座標からGridMapの整数座標を取得し、2Dマップ座標(X, Z)に変換
	var map_coord: Vector3i = grid_map.local_to_map(grid_map.to_local(global_position))
	current_grid_pos = Vector2i(map_coord.x, map_coord.z)

	# 2. カメラの現在の「正面ベクトル」から、4方位のどれに一番近いかを判定
	var forward_vector: Vector3 = -global_transform.basis.z

	if abs(forward_vector.z) > abs(forward_vector.x):
		# Z軸方向のベクトルが強い場合(北か南)
		if forward_vector.z < -0.5:
			current_dir = Direction.NORTH # Godotの3D空間では-Zが北
		else:
			current_dir = Direction.SOUTH # +Zが南
	else:
		# X軸方向のベクトルが強い場合(東か西)
		if forward_vector.x > 0.5:
			current_dir = Direction.EAST  # +Xが東
		else:
			current_dir = Direction.WEST  # -Xが西

	# 3. デバッグ用にコンソール(出力ウィンドウ)に現在の状態を表示
	print_status()

# 状態を文字列としてコンソールに出力する
func print_status() -> void:
	var dir_string: String = ""
	match current_dir:
		Direction.NORTH: dir_string = "北"
		Direction.EAST:  dir_string = "東"
		Direction.SOUTH: dir_string = "南"
		Direction.WEST:  dir_string = "西"

	print("現在地: (X: %d, Y: %d) | 向き: %s" % [current_grid_pos.x, current_grid_pos.y, dir_string])
コード (camera_3d.gd) を上記のように書き換えてください。現在地がコンソールに表示されるようになります。
| 座標の表現 | GridMapのセル座標 (Vector3i) から、高さを除いた (X, Z) の2次元整数として管理します。 |
| 向きの表現 | 3Dの回転角度 (クォータニオンやオイラー角) をそのまま扱うと条件分岐が複雑になるため、内部的には NORTH, EAST, SOUTH, WEST という 列挙型 (enum) で厳密に管理します。 |
Wizのマップ表示に合わせて current_grid_pos.y として出力していますが、内部データは GridMap の Z 軸の値を保持しています
現在座標と向きの画面表示 (テキスト)
Godotの標準的なUIノードである CanvasLayer と Label を使用して、3D画面の最前面に情報を描画します。3D空間のカメラの動きとは独立して動作する UI を作ります。
CanvasLayer の作成
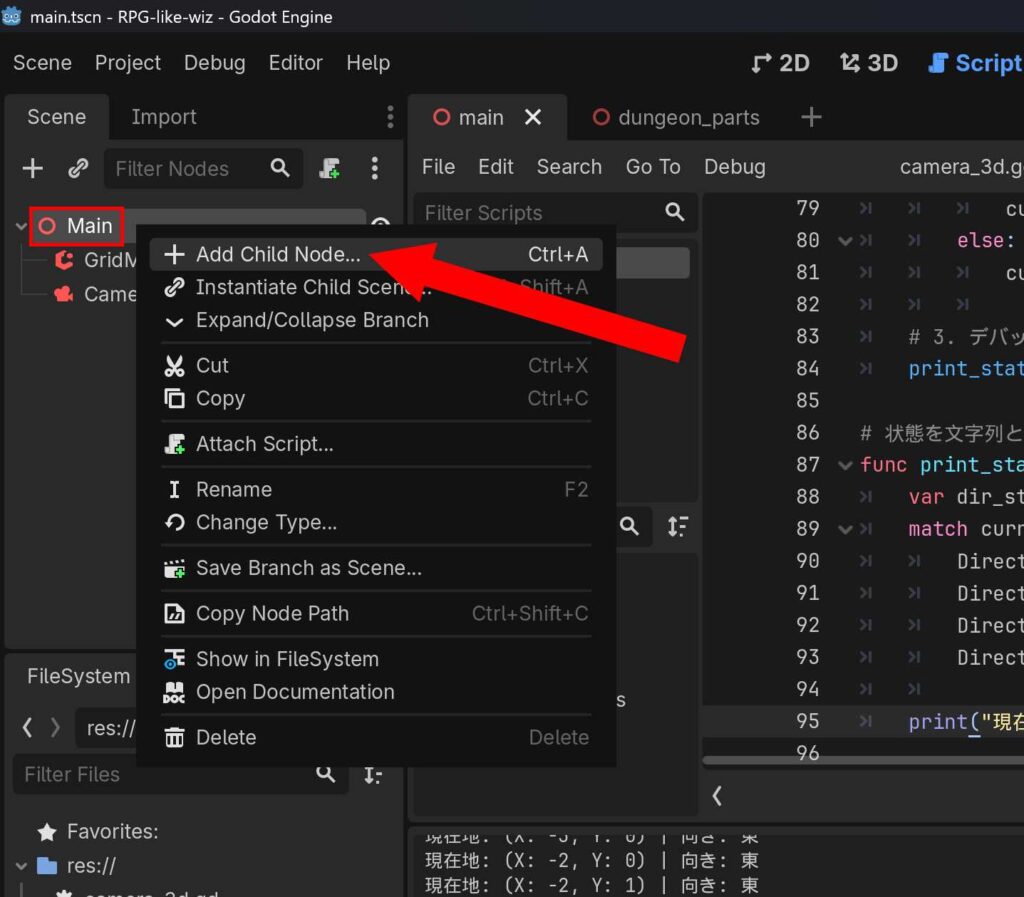
Main シーンのルートノードを右クリックし、Add Child Note を選択します。
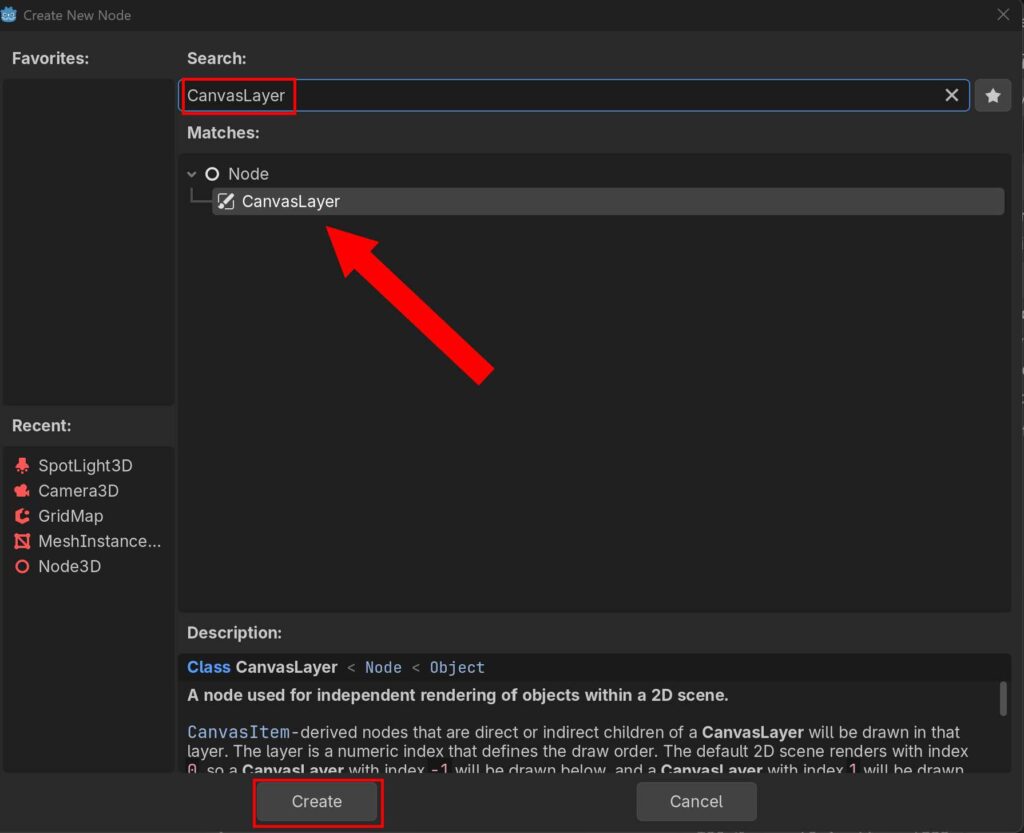
CanvasLayer を検索し、作成してください。
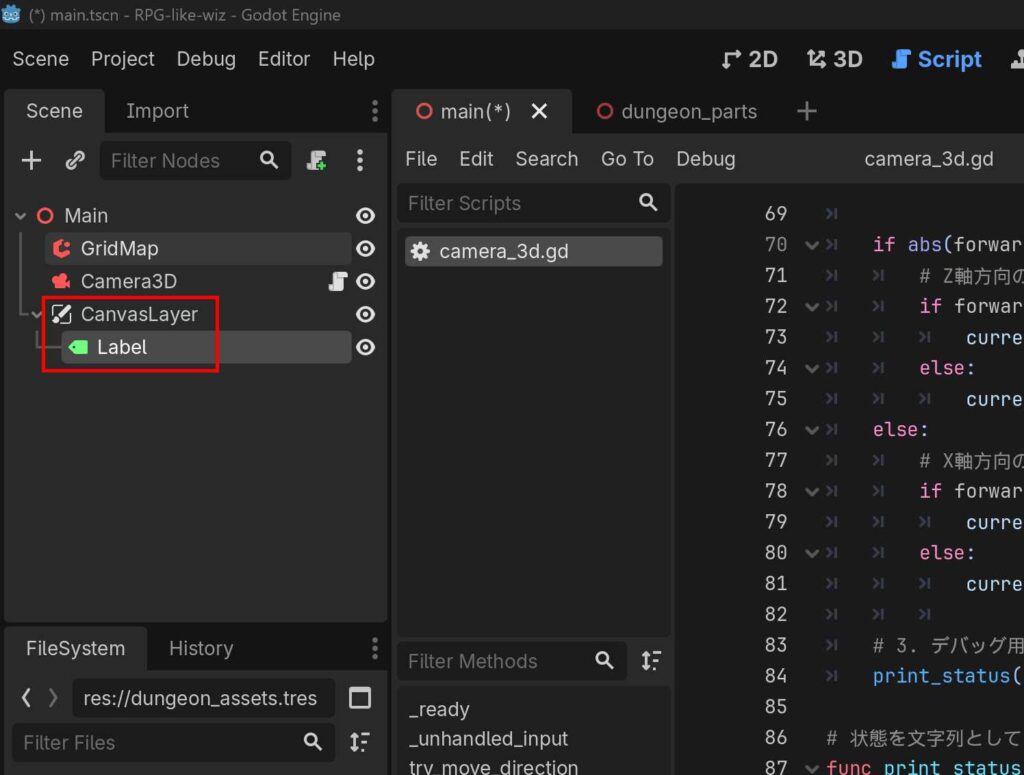
Label の作成
追加した CanvasLayer を右クリック、Add Child Node を選択して Label ノードを追加します。
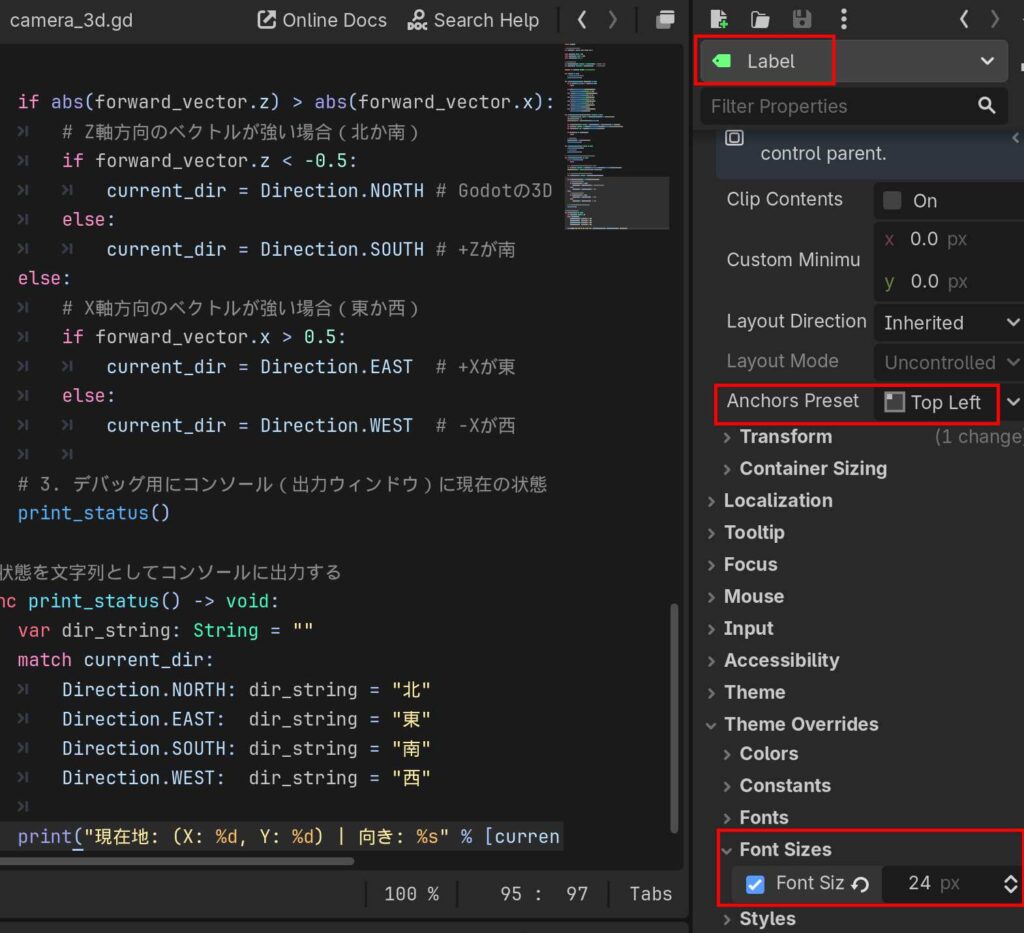
Label ノードを選択し、Inspector のプロパティを以下のように設定します。
| Text | 現在地: (X: 0, Y: 0) | 向き: 北 ※ 仮の値、なくても大丈夫なはず |
| Control > Layout > Anchors Preset | Top Left か Top Wide |
| Control > Theme Overrides > Font Sizes > Font Size | 24px ※ 任意 |
コードの修正
extends Camera3D

enum Direction { NORTH, EAST, SOUTH, WEST }

const MOVE_STEP: float = 2.0
const ROTATE_STEP: float = 90.0
const WALL_ITEM_ID: int = 1

var current_grid_pos: Vector2i = Vector2i.ZERO
var current_dir: Direction = Direction.NORTH

@onready var grid_map: GridMap = $"../GridMap"
# 💡 UIのLabelノードへの参照を追加(パスは配置に合わせて調整してください)
@onready var status_label: Label = $"../CanvasLayer/Label"

func _ready() -> void:
	update_player_status()

func _unhandled_input(event: InputEvent) -> void:
	if not event.is_pressed() or event.is_echo():
		return

	if event.is_action_pressed("move_forward"):
		try_move_direction(Vector3(0, 0, -1))
	elif event.is_action_pressed("move_backward"):
		try_move_direction(Vector3(0, 0, 1))
	elif event.is_action_pressed("move_left"):
		try_move_direction(Vector3(-1, 0, 0))
	elif event.is_action_pressed("move_right"):
		try_move_direction(Vector3(1, 0, 0))
	elif event.is_action_pressed("turn_left"):
		rotate_horizontal(ROTATE_STEP)
	elif event.is_action_pressed("turn_right"):
		rotate_horizontal(-ROTATE_STEP)

func try_move_direction(local_direction: Vector3) -> void:
	var direction_vector: Vector3 = global_transform.basis * local_direction
	direction_vector.y = 0
	direction_vector = direction_vector.normalized()

	var target_global_pos: Vector3 = global_position + (direction_vector * MOVE_STEP)
	var map_coord: Vector3i = grid_map.local_to_map(grid_map.to_local(target_global_pos))
	var cell_item_id: int = grid_map.get_cell_item(map_coord)

	if cell_item_id == WALL_ITEM_ID:
		return

	global_position = target_global_pos
	update_player_status()

func rotate_horizontal(deg: float) -> void:
	rotate_y(deg_to_rad(deg))
	update_player_status()

func update_player_status() -> void:
	if not is_inside_tree():
		return

	var map_coord: Vector3i = grid_map.local_to_map(grid_map.to_local(global_position))
	current_grid_pos = Vector2i(map_coord.x, map_coord.z)

	var forward_vector: Vector3 = -global_transform.basis.z

	if abs(forward_vector.z) > abs(forward_vector.x):
		if forward_vector.z < -0.5:
			current_dir = Direction.NORTH
		else:
			current_dir = Direction.SOUTH
	else:
		if forward_vector.x > 0.5:
			current_dir = Direction.EAST
		else:
			current_dir = Direction.WEST

	# 💡 コンソールだけでなく、実際の画面UIを更新する
	update_ui_display()

	# 💡 移動や旋回が確定した「直後」にイベントチェックを走らせる
	check_coordinate_event()

# 💡 UI表示用の関数
func update_ui_display() -> void:
	if status_label == null:
		return

	var dir_string: String = ""
	match current_dir:
		Direction.NORTH: dir_string = "北"
		Direction.EAST:  dir_string = "東"
		Direction.SOUTH: dir_string = "南"
		Direction.WEST:  dir_string = "西"

	status_label.text = "現在地: (X: %d, Y: %d) | 向き: %s" % [current_grid_pos.x, current_grid_pos.y, dir_string]

# 💡 🛠️ ステップ7:座標イベントシステム(基盤)
func check_coordinate_event() -> void:
	# 辞書(Dictionary)型を使い、Vector2iの座標をキーにしてイベントを定義する
	# 例: 座標 (X:0, Y:-2) に踏み込んだら特定のテキストを出す
	var events: Dictionary = {
		Vector2i(0, -2): "「前方に強い気配を感じる…」",
		Vector2i(2, -4): "「壁に奇妙な文字が刻まれている。『引き返せ』」",
		Vector2i(1, -1): "ピピッ!床のスイッチを踏んだ!マスの罠が作動した!"
	}

	# 現在の座標がイベントリストに存在するかチェック
	if events.has(current_grid_pos):
		var event_message: String = events[current_grid_pos]
		print_debug_message(event_message)

# イベントメッセージの一時出力用(後々、メッセージウィンドウUIに差し替えます)
func print_debug_message(msg: String) -> void:
	print("[EVENT TRIGERED] ", msg)
Camera_3d.gd のコードを上記のように書き換えてください。これは、配置した Label ノードへスクリプトからアクセスし、コンソールに出力していた文字列を画面上のUIに反映させるものです。
| CanvasLayer によるUIカプセル化 | ゲーム画面にテキストを表示する際、3D空間の中に直接Labelを置いてしまうと、カメラが動いた時に文字が置いていかれたり歪んだりします。CanvasLayer は3D空間とは独立した「2Dのスクリーン(透明な下敷きのようなもの)」を最前面に1枚重ねるノードなので、UIを常に正しい解像度・位置に固定して表示できます。 |
| 座標イベントの Dictionary ルックアップ | イベントの検知に if 文を大量に並べる (if x == 0 and y == -2: … )のは保守性が最悪になります。 今回は Vector2i をキー、発生するイベントを値とした Dictionary で管理する設計にしました。これにより、マップ上に100個イベントが増えようとも、判定処理は events.has(current_grid_pos) の1行だけで済み、計算量も $O(1)$ で処理されるため極めて堅牢です。 |
画面中央に表示されるメッセージウィンドウの実装
今回はただ文字を出すだけでなく、「イベントが発生した時だけウィンドウがポップアップし、ボタンまたはキー入力を押したら閉じる」という、ゲームループの制御 (インプットのインターセプト) を組み込んだUIシステムを構築します。
画面中央に表示されるメッセージウィンドウUIの実装
この記事では画面中央にメッセージウィンドウが出るようにします。画面上部や下部に出したい、ウィンドウサイズを変更したいなどは、各々でアレンジを加えていただけたらと思います。
PanelContainer の追加
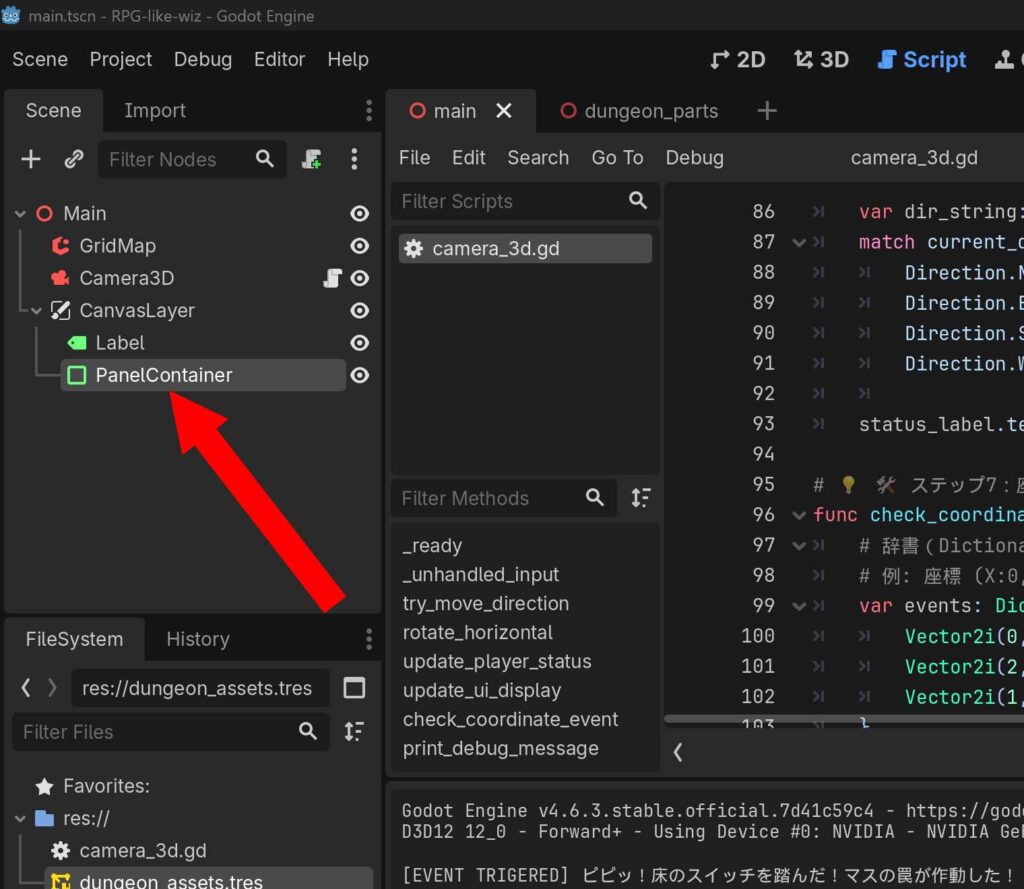
CanvasLayer ノードを右クリック、Add Child Node で PanelContainer を追加します。
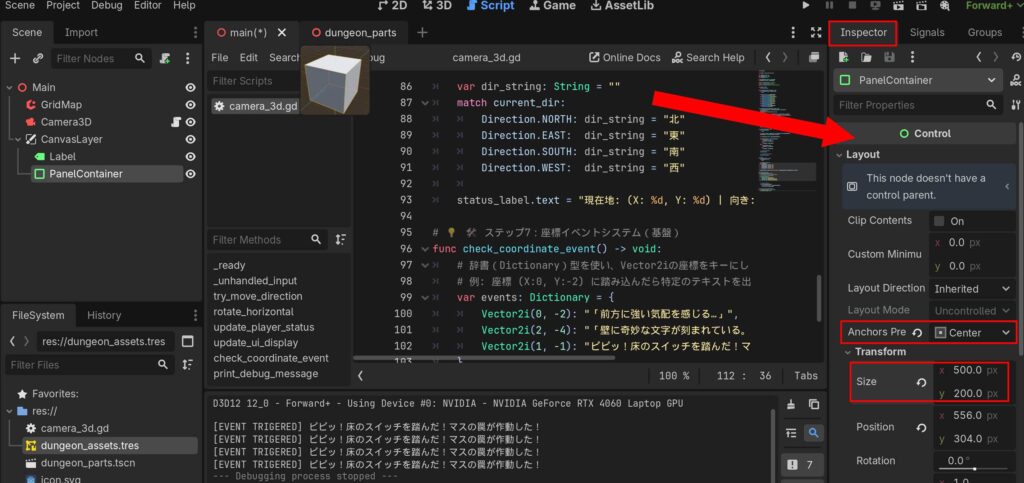
PanelContainer の Inspector を以下のように設定します。(以下は例です。お好みで変えてください)
| Control > Layout > Anchors Preset | Center |
| Control > Layout > Transform > Size | X: 500.0 px, Y: 200.0 px |
メッセージパネルの位置がズレるようなら、一度 Top Left など別の位置にしてから元に戻すと直るかもしれません。
Label の追加
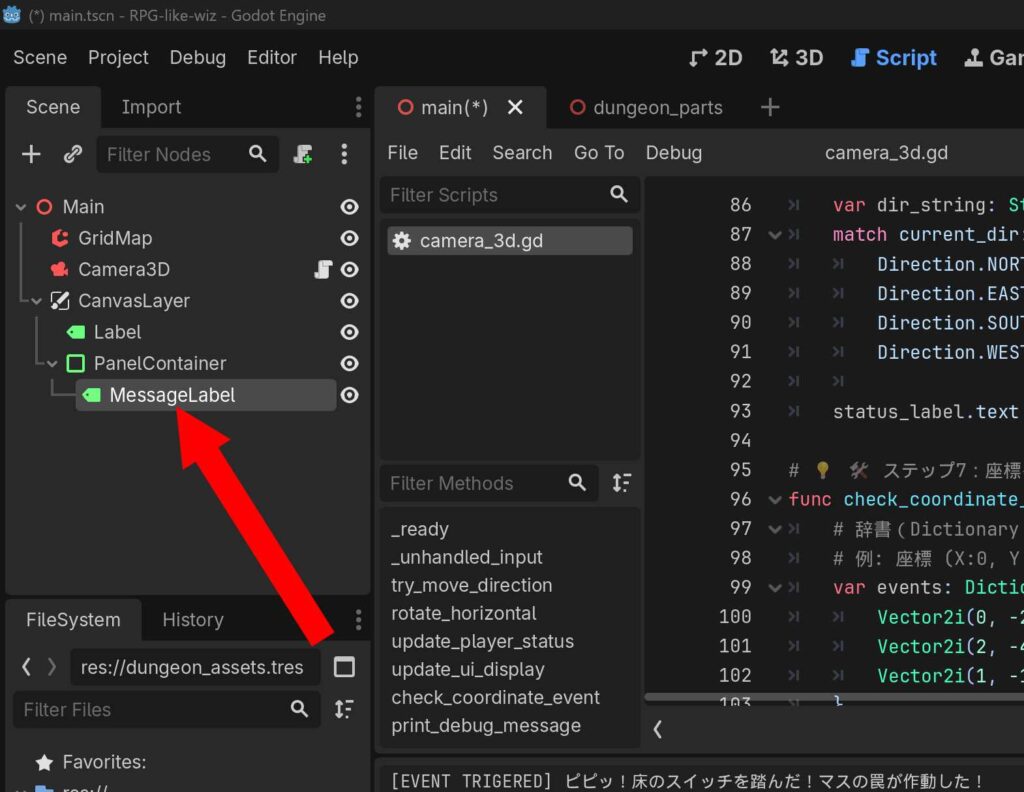
PanelContainer の下に、さらに子ノードとして Label を追加します。Label は コードから判別しやすいように MessageLabel と名前を変更します。
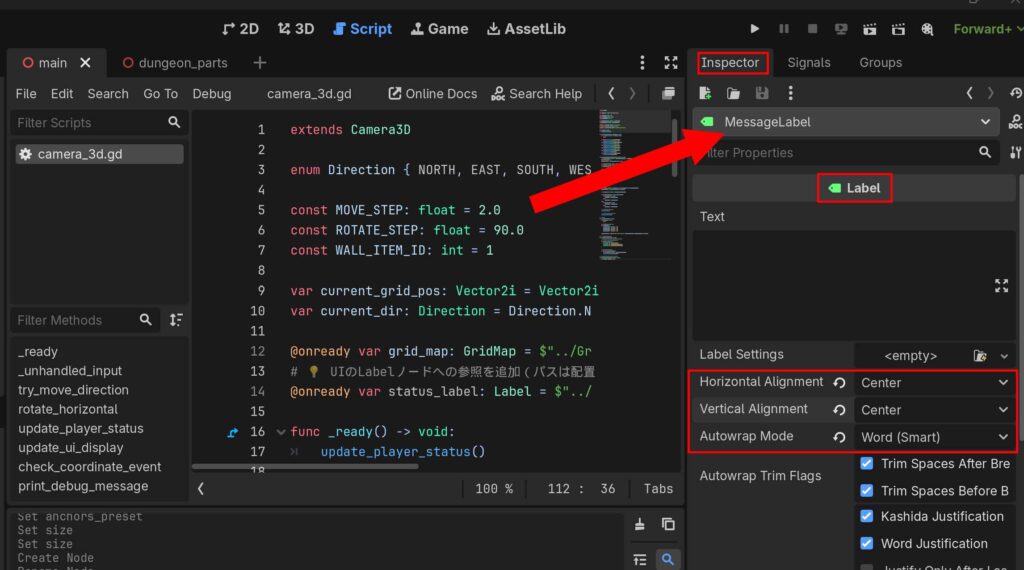
追加した Label (MessageLabel) の Inspector を開き、内容を以下のように設定します。
| Label > Horizontal Alignment | Center |
| Label > Vertical Alignment | Center |
| Label > Autowrap Mode | Word か Arbitrary |
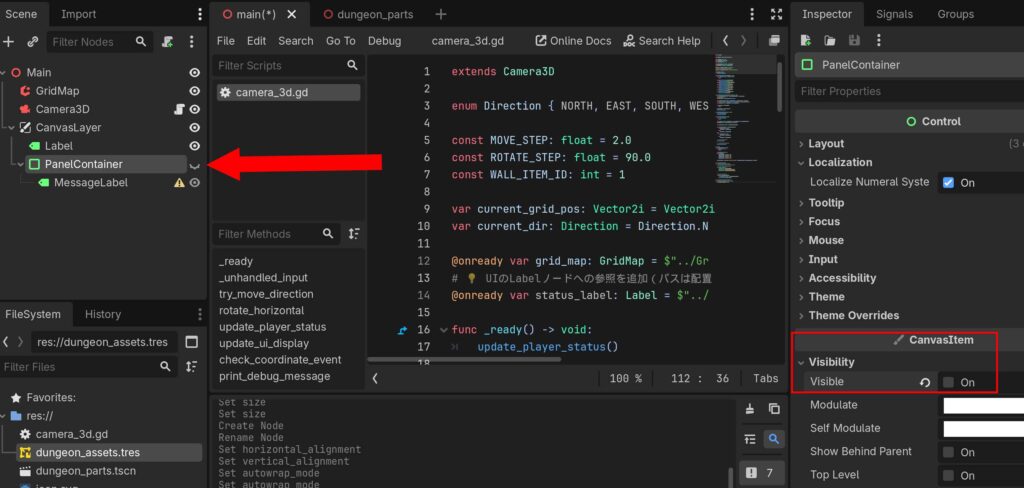
最後に、親である PanelContainer の Inspector から Visibility > Visible のチェックを外して非表示にしておきます。これは、このイベントウィンドウは「イベント発生時以外は非表示」にするためのものです。
コードの修正
extends Camera3D

enum Direction { NORTH, EAST, SOUTH, WEST }

const MOVE_STEP: float = 2.0
const ROTATE_STEP: float = 90.0
const WALL_ITEM_ID: int = 1

var current_grid_pos: Vector2i = Vector2i.ZERO
var current_dir: Direction = Direction.NORTH

# 💡 UIの状態管理フラグ
var is_showing_message: bool = false

@onready var grid_map: GridMap = $"../GridMap"
@onready var status_label: Label = $"../CanvasLayer/Label"

# 💡 新規追加:メッセージウィンドウ関連のノード参照
@onready var message_window: PanelContainer = $"../CanvasLayer/PanelContainer"
@onready var message_label: Label = $"../CanvasLayer/PanelContainer/MessageLabel"

func _ready() -> void:
	update_player_status()
	# 初期状態ではウィンドウを確実に閉じておく
	if message_window:
		message_window.hide()

func _unhandled_input(event: InputEvent) -> void:
	if not event.is_pressed() or event.is_echo():
		return

	# 💡 【排他制御】メッセージ表示中の入力処理
	if is_showing_message:
		# メッセージ表示中に「前進(Wや決定ボタン)」が押されたらウィンドウを閉じる
		if event.is_action_pressed("move_forward"):
			close_message_window()
		return # メッセージ表示中は、移動や旋回の入力をこれ以降に進ませず遮断する

	# 通常の移動・旋回入力
	if event.is_action_pressed("move_forward"):
		try_move_direction(Vector3(0, 0, -1))
	elif event.is_action_pressed("move_backward"):
		try_move_direction(Vector3(0, 0, 1))
	elif event.is_action_pressed("move_left"):
		try_move_direction(Vector3(-1, 0, 0))
	elif event.is_action_pressed("move_right"):
		try_move_direction(Vector3(1, 0, 0))
	elif event.is_action_pressed("turn_left"):
		rotate_horizontal(ROTATE_STEP)
	elif event.is_action_pressed("turn_right"):
		rotate_horizontal(-ROTATE_STEP)

func try_move_direction(local_direction: Vector3) -> void:
	var direction_vector: Vector3 = global_transform.basis * local_direction
	direction_vector.y = 0
	direction_vector = direction_vector.normalized()

	var target_global_pos: Vector3 = global_position + (direction_vector * MOVE_STEP)
	var map_coord: Vector3i = grid_map.local_to_map(grid_map.to_local(target_global_pos))
	var cell_item_id: int = grid_map.get_cell_item(map_coord)

	if cell_item_id == WALL_ITEM_ID:
		return

	global_position = target_global_pos
	update_player_status()

func rotate_horizontal(deg: float) -> void:
	rotate_y(deg_to_rad(deg))
	update_player_status()

func update_player_status() -> void:
	if not is_inside_tree():
		return

	var map_coord: Vector3i = grid_map.local_to_map(grid_map.to_local(global_position))
	current_grid_pos = Vector2i(map_coord.x, map_coord.z)

	var forward_vector: Vector3 = -global_transform.basis.z

	if abs(forward_vector.z) > abs(forward_vector.x):
		if forward_vector.z < -0.5:
			current_dir = Direction.NORTH
		else:
			current_dir = Direction.SOUTH
	else:
		if forward_vector.x > 0.5:
			current_dir = Direction.EAST
		else:
			current_dir = Direction.WEST

	update_ui_display()
	check_coordinate_event()

func update_ui_display() -> void:
	if status_label == null:
		return

	var dir_string: String = ""
	match current_dir:
		Direction.NORTH: dir_string = "北"
		Direction.EAST:  dir_string = "東"
		Direction.SOUTH: dir_string = "南"
		Direction.WEST:  dir_string = "西"

	status_label.text = "現在地: (X: %d, Y: %d) | 向き: %s" % [current_grid_pos.x, current_grid_pos.y, dir_string]

func check_coordinate_event() -> void:
	# テスト用イベント辞書(自身のマップの座標に合わせて数値を調整してください)
	var events: Dictionary = {
		Vector2i(0, -2): "「前方に不気味な気配を感じる…」\n\n(Wボタンで閉じる)",
		Vector2i(2, -4): "壁に血文字が刻まれている。\n『引き返せ、この先は深淵なり』\n\n(Wボタンで閉じる)",
		Vector2i(1, -1): "足元でカチリと音がした!\nしかし罠は不発に終わったようだ。\n\n(Wボタンで閉じる)"
	}

	if events.has(current_grid_pos):
		var event_message: String = events[current_grid_pos]
		# コンソール出力ではなく、画面中央のUIに表示命令を出す
		show_message_window(event_message)

# 💡 新規追加:メッセージウィンドウを開く処理
func show_message_window(text: String) -> void:
	message_label.text = text
	message_window.show()     # PanelContainerを表示
	is_showing_message = true # フラグを立てて入力をロック

# 💡 新規追加:メッセージウィンドウを閉じる処理
func close_message_window() -> void:
	message_window.hide()      # PanelContainerを非表示
	is_showing_message = false # フラグを寝かせて移動可能に戻す
コード (camera_3d.gd) を上記のように書き換えてください。
こちらは、メッセージウィンドウの「開閉フラグ」を管理し、ウィンドウが開いている間はプレイヤーの移動入力をブロックする という、RPGとして必須の排他制御を実装するものです。また Dictionary を使い「イベントごとに、1回きりか、踏むたび毎回か」を個別に設定できるデータ構造になっています。
| is_repeatable が trueの場合 (ワナなどを想定) |
triggered_events への記録をスキップするため、マスを踏み直すたびに100%確実にメッセージが再発動します。 |
| is_repeatable が false の場合 (一回こっきりのイベントなどを想定) |
1度踏んだら二度と発動しません。 |
イベントのマスターデータ (events 辞書)の構造を拡張し、メッセージ文字列だけでなく「リピートするかどうかのフラグ (bool)」を一緒に持たせる設計です。
コメント